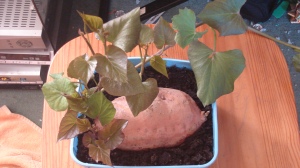
At the beginning of January, I placed a sweet potato in compost to try to start some slips ready to grow on in cold frames.

Sweet potato growing slips

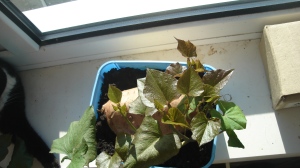
Now, one month later, I have a young triffid growing on my windowsill. The potato has sent up some shoots which have grown rather enthusiastically, and it is now time to try to remove them, plant them in their own containers, and wait to see if the potato sends up any more.

Growing sweet potato slips

The only problem it leaves me with is that these shoots are growing rapidly. Most of the shoots are a few inches long, but it has one tentacle that is about 18 inches and growing daily. It is WAY too cold to move them out to the garden, but they aren’t going to be able to stay indoors very much longer – time to put the thinking cap on I think!

Yesterday afternoon a pea-souper of a fog descended on us.  Probably a harbinger of some colder winter weather I suspect – it had that chill to it.  Wednesday afternoon is always a “get the chores done” afternoon, with no time for any extras.  On the other hand we are usually home by 5.30 on a Wednesday, so it is a nice long evening at home. What better time to curl up with a mug of coffee, a blanket and the seed catalogues.

Unfortunately I have my own inimitable style with seed catalogues, which usually entails taking a page of A4 paper, going through the catalogues and making a list of all the varieties I want to grow this year.  I then add up how much land I have available and set about my list with a hatchet.  Once I have the list down to an amount I can grow, I then price the list – and get out the hatchet again!  Finally I try to work out which veg I will want to eat fresh only, and which I am going to need to find room to store and then try to make a balance between the two.  I am sure this year will be no exception but I AM trying to put a little less on the original list this year.

I have started at the beginning with those veg that can/need to be planted early and will have to have some more planning sessions another time.  So, here goes…………

Leeks – “Musselburgh” (which I have grown before and find great) and I am going to try “Neptune” this year for the first time.

Parsnips – I will grow “White Gem” and “Tender and True”.  I have grown both of these before and have been very happy with them so sticking with those this year.

Cauliflower – I have grown “All the Year Round” in the past and I love the fact that they are mini cauliflowers.  With just two of us to feed most of the time, I full size cauliflower is too much, so we will have these again this year.

Tomatoes – The first one I am going to try this year is call “Hundreds and Thousands”.  It is an heirloom variety with a trailing habit so great for my balcony containers or maybe a hanging basket.  I am also going to try “Gardener’s Delight” – I don’t think I have tried this one before but it sounds good and seems to be happy out of doors so we’ll see how it goes.

Radishes  – I love radish so, in amongst my other radishes, another first for me is going to be “German Salad Radish”.  This appears to look like a radish coloured carrot and is used for slicing for salads etc.  Will have to see how the taste bears up.

 And I am afraid that is as far as I got last night – not a huge amount to show for an evening’s browsing but I got carried away with dreams of all those lovely spring veg for the picking.  But it’s a start – I will choose my onions and then get that lot ordered and worry about ordering the rest later I think.

What are you growing this year?  Are you trying anything new? Click here to tell us

Oriental poppy

I couldn’t resist taking a picture of this oriental poppy which was growing right next to the ragwort.

At this time of year, we turn once again to the task of pulling Ragwort from the fields to stop it spreading.


What is Ragwort?

Ragwort (Senecio jacobaea) is a poisonous plant often found growing on grazing land. It contains Alkaloids which, if ingested, cause cirrhosis of the liver and, in cows, inflammation of the 4th stomach. Most horses will not eat it when it is growing, unless they are absolutely starving and there is no other food. The biggest danger is that it is cut in along with the hay and then it WILL be eaten. Whilst it is still poisonous to goats, they have a greater tolerance to it.

In many places it is illegal to allow ragwort to set seed and, for most large animal owners, this time of year sees the start of ragwort season.

Ragwort is biennial(for the difference between biennial and bi-annual click here). This means that it takes two years to grow to seed.
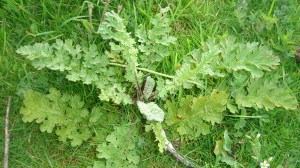
First year ragwort plant

In the first year, it grows as a low-growing rosette. It is still poisonous to animals, but has no ability to spread itself at this stage. BUT….(and it is a big but) if you pull it in the first year you will leave some pieces of root in the ground which can come back and re-grow. Likewise if you cut ragwort, it will just grow again from the base.
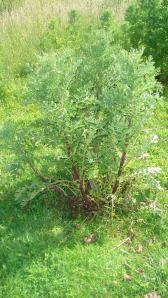
Ragwort second year growth

In the second year it grows to 2 – 3 foot high and produces clusters of beautiful bright yellow flowers. After it has flowered, the seeds are spread and the plant dies off. The important thing to remember here is that the ragwort has stored up all its energy in the roots in its first year of growth, ready to set seeds in the second year. If you cut it back early in it’s growth, it will just put up some more growth – it is programmed to flower and that is what it is going to do!
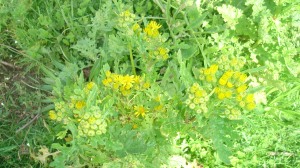
Ragwort flowers

So how do you get rid of ragwort?

The first thing to do is not to panic. Let’s look at why we want to get rid of the ragwort.

This comes into two categories.

Ragwort is toxic to animals.

Because ragwort is toxic,we don’t want our grazing animals eating it. That much is obvious. And we want to prevent it from setting seed.

So the first thing to do is to keep your animals off it. Now, if you just have one or two plants poking their noses through in your paddock then its not worth closing off the field so by all means go along and pull it out. The roots are quite tough so do it just after it has rained, when the ground is a little softer, and you will have better results. If the pulling is a problem for you, you can buy a ragwort fork for lifting the plant out with.

If you have a larger, dense, area of growth, then I would fence the animals off it. If it is a portion of your paddock then run an electric fence across it to keep them off. Remember, the ragwort itself isn’t a problem if the animals aren’t grazing in amongst it. You don’t need to get in and pull a load of first year ragwort unless you really need to graze that area.

We mustn’t let ragwort set seed.

Now this is easy to deal with. Wait! That’s right – don’t be fooled into running out and pulling the ragwort as soon as it shoots up. Remember what we said earlier – if you pull it too early, it will just re-grow. So wait! Wait until the ragwort is in flower. At this stage, the ragwort thinks it has won. It is in flower, it’s job is done and it is preparing to die back anyway. So once those flowers come, THEN get out there and pull it. At this stage the plant will not re-grow, and you have interrupted the seeding cycle by preventing the seeds from spreading.

Now comes the even more important bit. Clear it all up. Make sure that you gather up ALL the dead plants. Either take a wheelbarrow or a tarp with you as you pull the plants and put them straight onto it – not onto the ground first. Then take the plants and either burn them on a bonfire or take them to you local dump where your authority may have a disposal system in place. Do NOT just make a heap of the plants and leave them to die off there. Firstly there is still a danger that something might eat them. Secondly, ragwort will continue to try to set the seeds, even after it is pulled from the ground. So the plants need to be destroyed.

If you have acres and acres of land to clear, this obviously isn’t going to work for you. Large scale farmers spray the plants and then wait and hope that they all die off. Unfortunately, by spraying the area you will also kill off all the other broad-leaved plants (basically everything except grass) many of which are beneficial either to your livestock, your land, or the wildlife.

Likewise, if you have land that you really NEED to graze, then you can’t afford to fence it off and wait. In that instance you will have to make the choice between pulling it, having it sprayed, or having it cut.

One year’s seeds, seven years’ weeds.

Will you have ragwort again next year?Yes, almost certainly you will. Weed seeds live in the ground for many years (up to 60 in the case of poppies) and will keep growing. Add to that the effect of seeds blowing in from elsewhere and you will probably never be entirely free from ragwort.

Just remember three key things ……don’t panic, don’t let the livestock graze in amongst it, and don’t let it set seed.
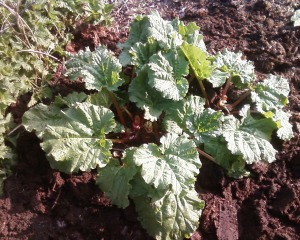
Why do you need to split rhubarb?

One of the joys of growing rhubarb is that it virtually grows itself.  It is, on the whole, a very low maintenance plant.  One of the few problems is that, eventually,  rhubarb will outgrow itself and the plant will weaken.  So, the answer is to split it every few years.   This isn’t as hard as it sounds and the advantage  is that you can increase your stock of rhubarb every few years, or have some to give away or barter – sounds like a win win to me!

rhubarb

How do you split rhubarb?

The first step is to prepare a patch of ground for your new rhubarb plants.  Once your rhubarb is in you won’t be able to dig the ground again, so give it a thorough dig over, get all the weeds out.  Next, dig as many holes as you think you are going to need and add some well rotted muck.

There are 2 ways to split the plant.

Method 1

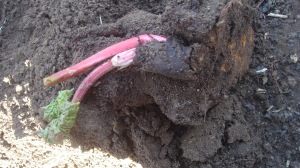
Dig up your existing rhubarb plant.  Try to do this as gently as possible.  The kindest way to the plant is to dig a small trench all the way around the plant, and then work inwards loosening the roots as you go.  Once you have the plant out of the ground, use a sharp spade to slice through the root of the plant and divide the rhubarb into viable sections.

splitting rhubarb

Method 2

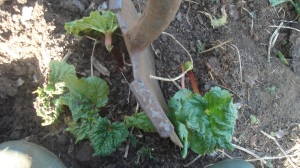
You may be able to see obvious new plants without actually digging up the whole root.  This is especially likely to be the case if you are overdue for splitting the plant, or if you are a little late in the spring and the plant is already sprouting (like I was this year).

If this is the case, you can split the plant by cutting down through the root where it is growing, and then gently lifting out the new section of plant.

rhubarb

Now plant your new plants

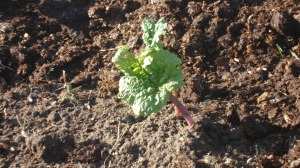
Whichever method of splitting the plant you use, you now need to plant your new root sections, mulch them well to keep the weeds down, and keep them watered while they establish themselves.

rhubarb

You won’t be able to use the rhubarb from these new plants for the first year.  Give the plant time to establish itself and, next year, it will reward you for your patience with lots more lovely fresh rhubarb.

balcony plants

So, the plan for this year on the balcony:

The runner beans will be grown in a trough, along the end wall of the balcony, with a frame of bamboo leaning against the wall for support.  This way they will all have the benefit of the sun, and hopefully will grow more uniformly.  The drawback to this is that the trough may not be deep enough for the bean roots – only time will tell.

The sugar snap peas will also be grown in a trough – possibly on the opposite side of the balcony where, I think, they will benefit from a little more sun.

The salad leaves will grow in a trough the same as last year but may move across the balcony as I don’t think they need the sun quite as much as some of the other plants.  Being a low growing plant though, I can always move them around later if need be.

The tomatoes will grow in individual pots so that I can juggle with their position while they are still small and, hopefully find the best spot for them.  Obviously once they grow taller, they will have to remain in one place.

The radishes I am still not totally sure about.  They were so successful last year that I will grow a number of trays this year – but I think they will just have to be moved around depending on where there is space at any given time.

The herbs will be the same as before, although I may add parsley and chives to the mix this year.  Grown in individual pots, the herbs are easy to move around to accommodate the other plants.

The strawberries – on a trip to wander around the garden shop, I found what I think is the answer to my problems.  Funnily enough someone else has solved the problem for me and they make a container, same idea as the flower pouches, especially for strawberries.  Who knew?  They will hopefully enjoy being at the end of the balcony, beside the runner beans.  If not, the beauty of these new containers is that I will be able to shuffle them around as well.

French beans – I am not sure I am going to try these on the balcony this year – although I may pop half a dozen seeds in just to see if they come to anything.  But after last year’s failures, I may just decide not to bother.

And another experiment for this year – Garlic.  I have had it on my kitchen windowsill getting cold over the winter, and now it has sprouted so I am growing to plant some in the garden, and some in a tray on the balcony like the radishes.  Whilst I know that this is not the conventional way to start garlic, it seems to me there’s no harm in trying – nothing ventured nothing gained!


I think any other available space will be needed for starting plants for the main garden such as pumpkins and sweet corn.


Our runner beans are now growing like, well like beans I suppose 😉 They are making their way steadily up their supports, and starting to flower now, showing promise of lovely fresh runner beans for the table before too much longer. One of the joys of homegrown vegetables is the difference in taste that comes with freshly picked produce, and I am looking forward to our first feed of fresh runner beans.

Plant care

But, although the plants are growing well, we are not ready to put them on the menu yet. At this stage, the care of plants is a matter of four categories – support, pest damage, nutrition and general plant care.

Support

If you are growing climbing runner beans, they need a reasonbly strong support to climb up. You may need to tie the climbing “nose” of the plant in to begin with, but the growing beans will soon find the structure and twine themselves around. I find something fascinating about watching the beans’ progress up the poles as they grow, Jack’s beanstalk had nothing on our runner beans 😀

Pest damage

There are one or two garden pests that love runner beans, and good plant care suggests that we need to be on the look-out for them.

Snails (and slugs) are one of the main culprits. They will eat away large patches of leaf and, if they catch the plant young enough, will strip the leaves right away to the bare stem, looking for all the world as though a swarm of locusts had just flown through. Snails will be found hiding in cool crevices – under or behind flower pots, under the rim of flower pots, in the spout of the watering can etc. The only thing to do with them is remove them – you can either kill them, or evict them to the garden of your nearest non-gardening neighbour 😉

Pea and bean weevils will also eat away at the bean leaves but, in their case, they will nibble away delicately at the edges of the leave, leaving them looking a little bit like the edges of a postage stamp. Once the beans are mature, they will generally recover from a weevil attack, but they can totally destroy seedlings.

Halo blight shows itself as yellow patches on leaves, with a brown centre to them. Called “halo blight” because the yellow rings take on the appearance of halos around the brown middles. The plants will be stunted and yields low. Destroy diseased plants and rotate your crops so that beans are not grown again in the same spot for some time.

Nutrition

It is possible for peas and beans to fail to flower if they have too much nitrogen. A balanced fertilizer with phosphorus and potash is needed for them.

Beans need plenty of water from the time the pods start to form, and mulching can help to keep the moisture levels up. A liquid feed in the water from time to time through cropping is needed.

General plant care

Hoe regularly around beans to keep the weeds down and the soil open.

Remove the growing tips once the plants reach the top of their supports – this will encourage the beans to thicken up from the bottom.

Once the pods have reached an edible size, be sure to pick them regularly. Firstly, they are much better to eat when they are young and tender and, secondly, if the pods are allowed to mature, the plants will stop producing any more.

Lastly – look forward to sitting down to a feast of fresh, tender, runner beans 🙂

Leave a comment 

Runner bean trivia

What’s eating my runner beans?